If you’ve got a shingle or potentially some other type of similar roof, you might be wondering whether you need to install a drip edge. If that’s the case, then you’re in the right place. We’re going to look a bit more closely at the topic of drip edges and work out if you really need one, and what the benefits are.
Not only that, but we’re going to show you how to install drip edge yourself. So if you want to know more about drip edges for your roof, then keep reading.
How to Install Drip Edge – Intro
Not everyone decides to install a drip edge, and not every roofer will recommend it. That being said, it could be worth it for your roof. But before we look more closely into why you might want a drip edge and what they’re good for, you might simply want to know what they actually are. So let’s have a look:
What are drip edges on roofs?
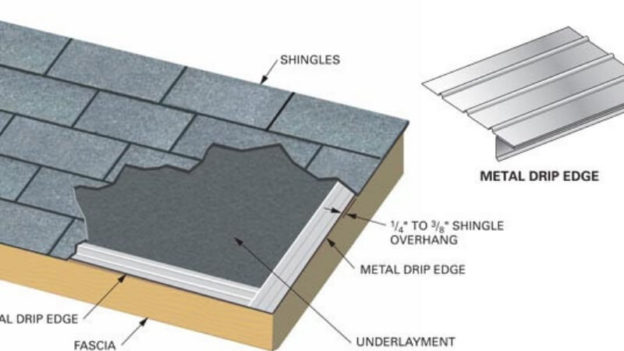
Drip edges tend to be L shaped and are metal sheets which are installed on the edge of a roof. This type of edge is normally installed on shingle roofs, but not always. It can also be known as drip edge flashing and is designed to direct water away from the roof and house and into a gutter.
Some consider drip edges crucial, but others don’t. This can often depend on how much rainfall might be expected as well as what level of water-roofing the roof itself has.
If you don’t have a drip edge, the water might get under the roof and end up beneath the shingles. This can cause damage to parts of the roof or even the home, especially in the form of leaks. Fixing a leak can be time-consuming, expensive and sometimes difficult, so it might be worth taking the preventative measure of installing drip edges instead.
Drip edges weren’t always installed when the roof is originally put in place, but as building codes have evolved they are now required in many different locations for new builds.
How can drip edges help?
As we’ve already touched on, drip edges are mainly for directing water away from the home and preventing it getting into the roof and causing further damage. But let’s have a look at this in a bit more detail:
Water droplets can stick to each other and the surfaces they land on due to cohesion and surface tension. A drip edge will work with these forces to direct the water into the gutter. Gravity helps a bit, too.
Even if you haven’t got a gutter on your roof, a drip edge can still help by directing water away from the house and stop it running down the fascia into cavities.
If you haven’t got a drip edge, water can stick to shingles and slowly work itself down into the roof. This can cause a leak or other issues, including rot. It’s therefore much easier to simply install a drip edge rather than having to carry out more expensive repairs later on.
While we’ve already looked at the main benefit of drip edges, that’s not all they’re good for. They can also help protect your roof from wind-driven rain. When the weather is serious, especially the win, water can be pushed around a lot on a roof.
Your roof tiles and shingles are designed to help stop such driving rain from affecting your roof, but the edges can be less protected. That means your drip edges need to hang a fair amount to stop wind pushing rain upwards into and underneath the roof.
You might need up to four inches edge coverage for this, depending on how much wind and rain you get in your area. Without these drip edges, extreme winds could damage your roof and require expensive repairs.
How to install drip edge
So now you’ve seen why you might need a drip edge on your roof, you probably want to know how to install one. Let’s have a look:
If you’re good at DIY you might decide this is a job you can do yourself. While lots of roof work will require a professional roofer, this isn’t necessarily one of them. If you want the extra peace of mind of going with a qualified roofer, then you can, but you could also use a handyman. For those who want to do the job yourself, here’s how:
Firstly, you need to remember that installing a drip edge isn’t the same as other roof work like eaves. For certain types of drip edges (type C particularly), you might want to install a furring edge around the roof, which is a strip of wood on the vertical surface of the house, just under the edge of the roof.
This will help keep the flange of the drip edge further from the house which will help keep water away from your home.
You’ll want to install drip edges on the eaves first. Place the edge down and fix it so that water will drip off it at the correct angle into the gutter. The flange should point downwards and away from the rest of the roof.
Use roofing nails to fasten the drip edges, starting high up on the drip edges so that shingles hang over the nailed areas. Nail every foot or so. Make sure no nails are more than 16 inches apart. Overlap each drip edge piece on the next one by around an inch.
Make cuts at the corners where the rake edges meet to make sure things fit properly. Make sure your corners overlap and are fully protected. Once your entire roof has drop edges all around it, you can install the underlayment.
Hopefully, these tips are enough to get you at least somewhat acquainted with the idea of installing and making the most of your own drip edges. If you aren’t sure about anything, consult a professional.
Feature image from hometipsforwomen.com